
Saturday, 27 May 2017
Friday, 26 May 2017
ESP8266 pin diagram

Rx -> is a Recevier
VCC -> is a power suplay compulsary you given to the power voltage is 3.5v if you given power is 5v then it is blam.
GPIO 0 -> is a data pin
RESET -> is a reset pin
CH_PD -> change power pin
GPIO 2 -> is a data pin2
TX -> is a transiver
GND -> is a ground pin
Ardunio Tutorial
What is an Arduino?
Arduino is a collection of three things. There are Hardware prototype platform, Arduino language and IDE & libraries. The Arduino boards are micro-controllers, not a full-fledged computer. They don’t run a full operating system, but simply write the code and execute as their firmware interprets it.
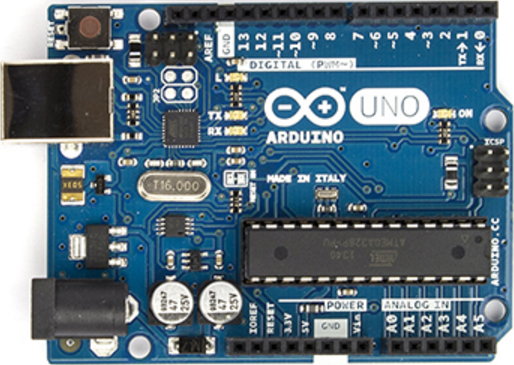
The main purpose of the Arduino board is to interface with the devices and sensors, so it’s great for hardware projects in which you simply want things to respond various sensor readings and manual input. This may not seem to be a lot, but it is actually a very sophisticated system that allows you to better manage your devices. It is great for interfacing with other devices and actuators, where a full operating system would be overload for handling simple read and response actions. It has 8-bit AVR microcontroller and hardware support for SPI, I2C and Serial.
Advantages (Pros)
Following are some of the main advantages of Arduino.
- Very easy to get started.
- Can be used for real-time applications for both hardware, software and IDE is open source.
- Not much programming knowledge needed to do basic stuff.
- It is very easy to extend and has tons of user contributed shields and libraries. Shields are available to do attractive much anything.
Disadvantages (Cons)
Following are some of the main limitations of Arduino.
- It is not very powerful when compared with Raspberry Pi
- You need to program using either Arduino or C/C++
- Connecting to the internet is slightly difficult, but not impossible. Parsing of Arduino with YQL and JSON is possible.
When to Use & Not Use Arduino
- If your project requires you to interact with a lot of external hardware requirements, then you should consider using Arduino.
- On the other hand, if your project requires a lot, so you have to write a complex software entire software stack or protocols, then Arduino may not be the best options.
Arduino Vs Raspberry Pi
Choosing which board you want depends on the type of project you want to make, and your experience in programming. If you have no experience in programming or electronics, you will find the Arduino a steeper learning curve than the Raspberry Pi as you will have to learn them both at the same time. The Arduino has been around for a while though, and there are tons of useful tutorials around to get you started. If you have experience in programming, you won’t be having problem in getting to grips with the Arduino straight away.
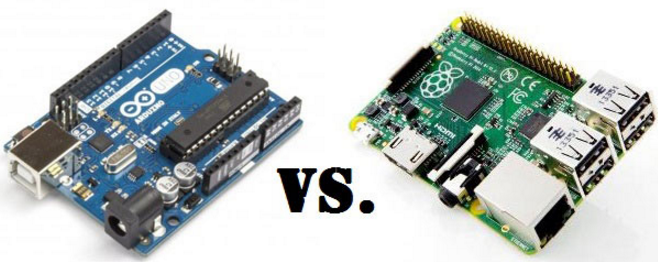
The Arduino is based on hardware, which means you won’t get far without some components: LCDs, LEDs, resistors, motors etc. Depending upon what project you want to do. You need no experience or components to get the Raspberry Pi to do something. Just plug and play.
If you want to make a hardware project, then the Arduino is the best choice. The input is given analog and get output is PWM and a whole spectrum of compatibility the Raspberry Pi cannot do natively. Plus the large I/O pins let you to connect the multiple sensors and feedback components. The Arduino however, is not as powerful as the Raspberry Pi, so there’s no proper video, audio, or internet out of the box. The Arduino can send data to your PC or Raspberry Pi, over serial, and you can then create a program to read this data and do something.
If you want to make a software project, then the Raspberry Pi is the way to go. The video, audio, and internet capabilities make it the winner in this aspect. There’s no need to attach external components, so there’s no real need to learn electronics.
| Feature | Raspberry Pi | Arduino |
| Programming Language | No limit | Arduini, C/C++ |
| Processor Speed | 700 MHz, | 16MHz |
| Internet connection very easy | Not easy | Doable |
| Hardware design | Closed source | Open source |
| Real time | Hardware realtime | In real time |
| Analog to Digital | No | Yes |
Thus, this is all about the differences between Arduino and Raspberry Pi. We hope that you have got a better understanding of this concept. Furthermore, any queries regarding this topic or electrical and electronics projects Please give your feedback by commenting in the comment section below. Here is a question for you, what are the applications of an Arduino and Raspberry pi?
Thursday, 25 May 2017
Humidity Values is send from Raspberry pi to MQTT Cloud Dashboard
import Adafruit_DHT
import RPi.GPIO as GPIO
import time
import mosquitto ,os , urlparse
import mosquitto
client = mosquitto.Mosquitto()
sensor = Adafruit_DHT.DHT11
#sensor = Adafruit_DHT.DHT22
GPIO.setmode(GPIO.BOARD)
# Defines the GPIO connected to the sensor data pin
pino_sensor=25
# Define event callbacks
def on_connect(mosq, obj, rc):
print("rc: " + str(rc))
def on_message(mosq, obj, msg):
print(msg.topic + " reddy" + str(msg.qos) + "reddy" + str(msg.payload))
def on_publish(mosq, obj, mid):
print("mid: " + str(mid))
def on_subscribe(mosq, obj, mid, granted_qos):
print("Subscribed: " + str(mid) + " " + str(granted_qos))
def on_log(mosq, obj, level, string):
print(string)
mqttc = mosquitto.Mosquitto()
# Assign event callbacks
mqttc.on_message = on_message
mqttc.on_connect = on_connect
mqttc.on_publish = on_publish
mqttc.on_subscribe = on_subscribe
# Uncomment to enable debug messages
#mqttc.on_log = on_log
# Parse CLOUDMQTT_URL (or fallback to localhost)
cloudurl = raw_input("enter url of broker:")
url_str = os.environ.get('CLOUDMQTT_URL',cloudurl)
url = urlparse.urlparse(url_str)
# Connect
mqttc.username_pw_set('rhmobvzr','kUNFt2x3YSTv')
mqttc.connect('m11.cloudmqtt.com', 13665)
# Start subscribe, with QoS level 0
mqttc.subscribe("iot", 0)
# Publish a message
topicname=raw_input("enter topic name:")
message=raw_input("message:")
mqttc.publish(topicname,message)
# Continue the network loop, exit when an error occurs
rc = 0
while rc == 0:
rc = mqttc.loop()
print("rc: " + str(rc))
while(1):
# Read the sensor
umid, temp = Adafruit_DHT.read_retry (sensor, pino_sensor);
# If reading case is ok, it shows the values on the screen
if umid is not None and temp is not None:
print ("Temperature = {0: 0.1f} Humidity = {1: 0.1f} \ n"). format (temp, umid);
print ("Wait 5 seconds to re-read ... \ n");
time.sleep (5)
else:
# Communication error message with the sensor
print ("Failed to read data from DHT11 !!!")
Raspberry pi Intraduction
What is a Raspberry Pi?
Raspberry Pi board is a fully functional computer or full-fledged credit card sized. It has all the trappings of a computer, with a dedicated memory, processor, and a graphics card for output through HDMI. It even runs a specially designed version of the Linux operating system and it is easy to install in most Linux software, and used the Raspberry Pi as a functioning video game emulator or media streamer with a bit of effort.
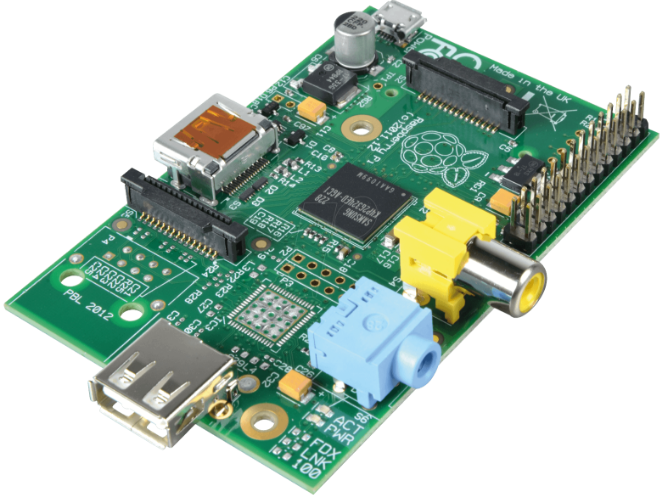
Though the Raspberry Pi doesn’t offer internal storage, we can use SD cards as the flash memory in the total system, allowing you to quickly swap out different versions of the operating system or software updates to debug. Because of this device is independent network connectivity, you can also set it up to access via SSH, or transfer files to it using FTP. It is having 512 MB RAM, 700 MHz microprocessor and hardware support for SPI, I2C and Serial.
Advantages (Pros)
Following are some of the main advantages of Raspberry Pi
- It is very easy to connect to the internet
- Entire Linux software stack is available
- Can be programmed using a variety of programming languages
Disadvantages (Cons)
Following are some of the main limitations of Raspberry Pi
- Accessing hardware is not a real-time. If the CPU is busy, then interfacing with the hardware can be delayed
- Does not have enough power to drive inductive loads
- There is no inbuilt Analog to Digital converter available
- The hardware design is not open source. Even though it is not a big deal, for some people it might a deal breaker
When to Use & Not Use Raspberry Pi
If your project is very limited hardware interaction, but is slightly complex on the software side or need to be connected to the internet then you should just go with Raspberry Pi. Also, if you want to program using a variety of programming languages, then you should choose Raspberry Pi.
On the other hand, if your project requires a lot of hardware interfaces and need to read data from a lot of sensors or need to control lot of devices, then Raspberry Pi may not be the best choice. Raspberry pi device looks like a motherboard with the mounted chips and ports exposed (Something you’d expect to see only if you opened up your computer and looked at its internal board), but it has all the components you need to connect input, output and storage devices and start computing.
Hardware And Software
Here’s an overview of some of the specs that show the biggest differences between the two:

Various components on raspberry pi board – ARM CPU/GPU – this is a Broadcom BCM 2835 system on a chip(SoC) that is made up of an ARM CPU and a video core for Graphics processing unit. The CPU handles all the computations that make a computer work, and the GPU handles graphics output.
GPIO – These are exposed general-purpose input/output connection points that will allow the real hardware hobbyists the opportunity to linker.
RCA – An RCA jack allows connection of analog TVs and other similar output devices.
Audio out – This is a standard 3.55- millimeter jack for connection of audio output devices such as headphones or speakers. There is no audio in.
USB – this is a common connection port for peripheral devices of all types.
HDMI – This connector allows you to lookup a high –definition television or other compatible device using an HDMI cable.
POWER – This is a 5v Micro USB power connector into which you can plug your compatible power supply.
SD card slot – An SD card with an os installed is required for booting the device.
Ethernet – This connector allows for wired n/w access and is only available on the Model B.
Setting up for a perfect pi experience:-
Step One: Install Raspbian Os Onto Your SD Card Using Raspbian
This means you’ll need to download the operating system on another computer and transfer it over to an SD card using an SD card reader. You have two ways of doing this. You can install Raspbian manually, which requires either command line know-how or external software, or you can download and install NOOBS, which stands for “New Out of Box Software.” It’s a much simpler process, and the one we’ll use here.
1. Put your SD card into your computer or SD card reader.
2. Download Raspbian or NOOBS.
3. Extract the ZIP file and copy the entire contents of the folder to your SD card. Once it’s complete, eject your SD card and insert it into the Raspberry Pi.
Step Two: Hook Up Your Raspberry Pi
Connecting all your devices to the Raspberry Pi is very easy, but you want to do it in a specific order so it can recognize all your devices when it boots up. First, connect your HDMI cable to your Raspberry Pi and your monitor, then connect your USB devices. If you’re using an Ethernet cable to connect to your router, go ahead and connect that as well.
Finally, once everything is connected, go ahead and plug in your power adapter. The Raspberry Pi does not have a power switch, so once you connect the power adapter, it’ll turn on all by itself.
Step Three: Set Up Raspbian
you’ll see a screen asking you to install an operating system.
1. At the bottom of the screen, choose your language and keyboard layout for your region.
2. Click the checkbox next to Raspbian, then click Install.
Step Four: Configure Your Raspberry Pi
In Raspbian, you’ll see a start menu where you can select applications, open up a file browser, and everything else you’d expect from an operating system.
Basic Linux commands practice:-
LS:- List the contents of the current directory (or one that is specified). Can be used with the -l flag to display additional information (permissions, owner, group, size, date and timestamp of last edit) about each file and directory in a list format. The -a flag allows you to view files beginning with . (i.e. dot files).
CD:- Changes the current directory to the one specified. Can use relative (i.e. cd directoryA) or absolute (i.e. cd /home/pi/directoryA) paths.
PWD:-
Displays the name of the current working directory, i.e. pwd will output something like /home/pi.
MKDIR:-
Makes a new directory, e.g. mkdir newDir would create the directory newDir in the present working directory.
RMDIR:-
Remove empty directories, e.g. rmdir oldDir will remove the directory oldDironly if it is empty.
RM:-
Removes the specified file (or recursively from a directory when used with -r). Be careful with this! Files deleted in this way are mostly gone for good!
CP:-
Makes a copy of a file and places it at the specified location (essentially doing a 'copy-paste'),
for example - cp ~/fileA /home/otherUser/ would copy the file fileA from your home directory to that of the user otherUser (assuming you have permission to copy it there!). This command can either take FILE FILE(cp fileA fileB), FILE DIR (cp fileA /directoryB/) or -r DIR DIR(which recursively copies the contents of directories) as arguments.
MV:-
Moves a file and places it at the specified location (so where cp performs a 'copy-paste', mv performs a 'cut-paste'). The usage is similar to cp, so mv ~/fileA /home/otherUser/ would move the file fileA from your home directory to that of the user otherUser. This command can either take FILE FILE(mv fileA fileB), FILE DIR (mv fileA /directoryB/) or DIR DIR(mv /directoryB /directoryC) as arguments. This command is also useful as a method to rename files and directories after they've been created.
TOUCH:-
Either sets the last modified time-stamp of the specified file(s) or creates it if it does not already exist.
CAT:-
Lists the contents of file(s), e.g. cat thisFile will display the contents of thisFile. Can be used to list the contents of multiple files, i.e. cat *.txt will list the contents of all .txt files in the current directory.
HEAD:-
Displays the beginning of a file. Can be used with -n to specify the number of lines to show (by default 10), or with -c to specify the number of bytes.
TAIL:-
Displays the end of a file. The starting point in the file can be specified either through -b for 512 byte blocks, -c for bytes, or -n for number of lines.
CHMOD
Normally used to change the permissions for a file. The chmod command can use symbols u (user that owns the file), g (the files group) , o (other users) and the permissions r (read), w (write) and x (execute). Using chmod u+x *filename* will add execute permission for the owner of the file.
CHOWN
Changes the user and/or group that owns a file. It normally needs to be run as root using sudo e.g. sudo chown pi:root *filename* will change the owner to pi and the group to root.
SSH
Secure shell. Connect to another computer using an encrypted network connection. For more details see SSH (secure shell)
SCP
Copies a file from one computer to another using ssh. For more details see SCP (secure copy)
SUDO
Run a command as a superuser, or another user. Use sudo -s for a superuser shell. For more details see Root user / sudo
DD
Copies a file converting the file as specified. It is often used to copy an entire disk to a single file or back again eg. dd if=/dev/sdd of=backup.img will create a backup image from an SD card or USB disk drive at /dev/sdd. Make sure to use the correct drive when copying an image to the SD card as it can overwrite the entire disk.
DF
Display the disk space available and used on the mounted filesystems. Use df -h to see the output in a human readable format using M for MBs rather than showing number of bytes.
UNZIP
Extracts the files from a compressed zip file.
TAR
Store or extract files from a tape archive file. It can also reduce the space required by compressing the file similar to a zip file.
To create a compressed file use tar -cvzf *filename.tar.gz* *directory/*To extract the contents of a file use tar -xvzf *filename.tar.gz*
PIPES
A pipe allows the output from one command to be used as the input for another command. The pipe symbol is a vertical line |. For example to only show the first 10 entries of the ls command it can be piped through the head command ls | head
TREE
Show a directory and all subdirectories and files indented as a tree structure.
&
Run a command in the background freeing up the shell for future commands.
WGET
Download a file from the web directly to the computer e.g. wget http://www.raspberrypi.org/documentation/linux/usage/commands.mdwill download this file to your computer as commands.md
CURL
Download or upload a file to/from a server. By default it will output the file contents of the file to the screen.
MAN
Show the manual page for a file. To find out more run man man to view the manual page of the man command.
SEARCH
GREP
Search inside files for certain search patterns e.g. grep "search" *.txt will look in all the files in the current directory ending with .txt for the string search.
Supports regular expressions which allow special letter combinations to be included in the search.
AWK
Programming language is useful for searching and manipulating text files.
FIND
Searches a directory and subdirectories for files matching certain patterns.
WHEREIS
Finds the location of a command. Looks through standard program locations until it finds the requested command.
NETWORKING
PING
Utility usually used to check if communication can be made with another host. Can be used with default settings by just specifying a hostname (e.g. ping raspberrypi.org) or an IP address (e.g. ping 8.8.8.8). Can specify the number of packets to send with the -c flag.
NMAP
Network exploration and scanning tool. Can return port and OS information about a host or a range of hosts. Running just nmap will display the options available as well as example usage.
HOSTNAME
Displays the current hostname of the system. A privileged (super) user can set the hostname to a new one by supplying it as an argument (e.g. hostname new-host).
IFCONFIG
Displays the network configuration details for the interfaces on the current system when run without any arguments (i.e. ifconfig). By supplying the command with the name of an interface (e.g. eth0 or lo) you can then alter the configuration (check the man-page for more details).
Installing packages in Linux:-
The APT is the tool, commonly used to install packages, remotely from the software repository. In short it's a simple command based tool that you use to install files/software's. Complete command is apt-get and it's the easiest way to install files/Software packages. This easy tools informs you about packages that are currently being installed and also it informs you about the packages that are available in repositories.
apt-get install ${packagename}
To remove/uninstall any software, just use remove
apt-get remove ${packagename}
The software packages are somewhere in the online repositories, APT handles a local database on the user's hard drive that contains information about the available packages and where they are located. So when the types of the command, apt-get install conky, the APT will start finding the package named conky in the database and will install conky once user types 'y' (yes). To get the all newly uploaded packages on the repositories, user need to update APT regularly.
To update APT database:
apt-get update
To update the APT database and also upgrade the security updates and patches that might be available for some installed software, users may do it at once just by using the commands like this:
apt-get update; apt-get upgrade
ex:
sudo apt-get install conky
sudo apt-get remove conky
sudo apt-get update
Raspberry pi Remote Desktop Connections
Remote access means to remotely control and to remotely access from anywhere is called remote control. Sometimes it is not convenient to work directly on the Raspberry Pi. Maybe you would like to work on it from another device by remote control. Multiple users to access through the same desktop at a time in different locations.
There are so many of advantages to get in remote access.
1. We can access remotely desktop from any place at any time.
2. Device connections are avoided
3. Fast access
4. If any problem occur many users can access to troubleshoot it.
Remotely login steps:
1.open your raspberry pi terminal and get install
Sudo apt-get install xrdp
2. check your raspberry pi ip address show by using ifconfig in terminal
3. in your windows operating system open putty and giving to the raspberry ip address then open
4. Security credentials purpose login to the raspberry pi username & Password
5.Then next open remote desktop connection and enter to the raspberry pi ip
address and connect
it, as there same as giving login details, then automatically connect it
6.Finally automatically open it raspberry pi desktop.
GPIO Control to raspberry:
GPIO stands for General-Purpose Input/ Output. The Raspberry Pi contains standard connectors that you are probably familiar with(Ethernet, HDMI, audio, and USB), but it also includes 26 pins (in two rows of 13) . thatare intended to connect directly to lower level devices. These pins are called the GPIO(general-purpose input/output) pins, because they are programmable input/output
pins intended for a wide range of purposes. The GPIO pins on a RaspberryPi are a great way to interface physical devices like buttons and LEDs with the little Linux processor.In just three lines of code, you can get an LED blinking on one of the GPIO pins.
pins intended for a wide range of purposes. The GPIO pins on a RaspberryPi are a great way to interface physical devices like buttons and LEDs with the little Linux processor.In just three lines of code, you can get an LED blinking on one of the GPIO pins.

Power Pins:
The header provides 5V on Pin 2 and 3.3V on Pin 1. The 3.3V supply is limited to 50mA. The 5V supply draws current directly from your microUSB supply so can use whatever is left over after the board has taken its share. A 1A power supply could supply up to 300mA once the board has drawn 700mA.
GPIO Pins:
There are totally 26 GPIO Pins . 17 pins are used to controlling outputs.
In the above diagram green colour pins all are output controlling pins.
Black clour pins are Ground pins. To protect you from electric shock.
Pin no 8 & 10 is a UART pins. UART transfer universal asynchronous Transmitter/Receiver. A popular serial communication interface which provides full duplex communication between two devices. The term universal means that transmission speed and data format is configurable. As it is asynchronous it doesn’t need to send clock signal along with the data signals. UART uses two data lines for sending (Tx) and receiving (Rx) data. The ground of both devices should be made common.

GPIO 3 & 5 is a I2C pins. I2C is a inter-integrate-circuit.
- I2C is a useful bus that allows data exchange between microcontrollers and peripherals with a minimum of wiring.
GPIO 19,21,23,24 &26 pins are SPI pins.SPI means serial peripheral interface.
SPI ia a same as I2C with similar applications
The Raspberry Pi has three types of serial interface on the GPIO header. You’re probably already familiar with the UART serial port, which allows you to open a login session from a serial terminal application, such as Putty.
The other two serial interfaces are the Serial Peripheral Interface (SPI) and Inter-Integrated-Circuit bus (I2C). SPI on the Pi allows for up to two attached devices, while I2C potentially allows for many devices, as long as their addresses don’t conflict.
SPI on Pi
Configuration
The SPI peripheral is not turned on by default. To enable it, do the following.
1. Run sudo raspi-config.
2. Use the down arrow to select 9 Advanced Options
3. Arrow down to A6 SPI.
4. Select yes when it asks you to enable SPI,
5. Also select yes when it asks about automatically loading the kernel module.
6. Use the right arrow to select the <Finish> button.
7. Select yes when it asks to reboot.

The system will reboot. When it comes back up, log in and enter the following command.
ls/dev/*spi*
The Pi should respond with
/dev/spidev0.0 /dev/spidev0.1
These represent SPI devices on chip enable pins 0 and 1, respectively. These pins are hardwired within the Pi. Ordinarily, this means the interface supports at most two peripherals, but there are cases where multiple devices can be daisy-chained, sharing a single chip enable signal.
I2C on Pi
Configuration:
Like the SPI peripheral, I2C is not turned on by default. Again, we can use raspi-config to enable it.
1. Run sudo raspi-config.
2. Use the down arrow to select 9 Advanced Options
3. Arrow down to A7 I2C.
4. Select yes when it asks you to enable I2C
5. Also select yes when it tasks about automatically loading the kernel module.
6. Use the right arrow to select the <Finish> button.
7. Select yes when it asks to reboot.

Raspi-config for I2C
The system will reboot. when it comes back up, log in and enter the following command
>ls /dev/*i2c*
The Pi should respond with
/dev/i2c-1
GPIO pin 27 & 28 is a EEPROM pins. EEPROMS is (Electrically Erasable Programmable Read-Only Memory) are a type of non-volatile memory .
The EEPROM holds the board manufacturer information, GPIO setup and a thing called a ‘device tree‘fragment – basically a description of the attached hardware that allows Linux to automatically load the required drivers.
Installation:
The newest version of Raspbian has the RPI.GPIO library pre-installed. You will properly need to update your library, so using the command line,run:
sudo python
import RPi.GPIO as GPIO
GPIO.VERSION
import RPi.GPIO as GPIO
GPIO.VERSION
The current version of RPIO.GPIO is 0.5.4 if you need to update a newer version, run:
sudo apt-get updatesudo apt-get upgrade
To add the GPIO Library to a sketch , you must import it:
Import RPIO.GPIO as GPIOWednesday, 24 May 2017
Amazon Web Service
My Secound programming connection is raspberry pi to AWS.
Sensor details send to raspberry pi board to AWS cloud.
Sensor details send to raspberry pi board to AWS cloud.
following the programming code is Temperature & Humidity sensor values send to AWS cloud.
from AWSIoTPythonSDK.MQTTLib import AWSIoTMQTTClient
import paho.mqtt.client as paho
import os
import socket
import ssl
import datetime
from time import sleep
from random import uniform
import RPi.GPIO as GPIO
import Adafruit_DHT
sensor = Adafruit_DHT.DHT11
#sensor = Adafruit_DHT.DHT22
GPIO.setmode(GPIO.BOARD)
# Defines the GPIO connected to the sensor data pin
pino_sensor=25
connflag = False
def on_connect(client,userdata,flags,rc):
global connflag
connflag = True
print("connection return result:"+str(rc))
def on_message(client,userdata,msg):
print(msg.Topic+" "+str(msg.payload))
mqttc = paho.Client()
mqttc.on_connect = on_connect
mqttc.on_message = on_message
awshost = "a1ajeyt0psxjow.iot.ap-southeast-1.amazonaws.com"
awsport = 8883
clientId = "temperature"
thingName = "temperature"
caPath = "/home/pi/tempcert/root-CA.crt"
certPath = "/home/pi/tempcert/temperature.cert.pem"
keyPath = "/home/pi/tempcert/temperature.private.key"
mqttc.tls_set(caPath,certfile=certPath,keyfile=keyPath,cert_reqs=ssl.CERT_REQUIRED,tls_version=ssl.PROTOCOL_TLSv1_2, ciphers=None)
mqttc.connect(awshost,awsport,keepalive = 60)
mqttc.loop_start()
timestamp = datetime.datetime.now()
# Read the sensor
umid, temp = Adafruit_DHT.read_retry (sensor, pino_sensor);
if temp is not None and umid is not None:
mqttc.publish("tempandhumd","credo websolutions"+"temperature"+str(temp)+"humidity"+str(umid)+"time"+format(timestamp),qos=1)
print("temperature"+"%.2f"%temp,"humidity"+"%.2f"%umid,"time" + format(timestamp))
else:
mqttc.publish("tempandhumd","sensor is not connected",qos=1)
print("values not sent")
while temp>30 and umid<60:
sleep(10)
if connflag == True:
timestamp = datetime.datetime.now()
# Read the sensor
umid, temp = Adafruit_DHT.read_retry (sensor, pino_sensor);
mqttc.publish("tempandhumd","change in temperature "+"temperature"+str(temp)+"humidity"+str(umid)+"time"+format(timestamp),qos=1)
print("temperature"+"%.2f"%temp,"humidity"+"%.2f"%umid,"time" + format(timestamp))
else:
print("waiting for connection")
o/p: finally run this code DHT11 sensor values is read in AWS cloud..
Subscribe to:
Posts (Atom)